Deep learning - Not C#
In Silicon Valley season 4, Jian-Yang builds an AI app that identifies pictures of hotdogs. Today I am going to make a similar app to identify C# from code fragments (in case you forget how C# looks like!).
Look at this Python trying to pretend to be your favorite language:
var = await.add(item)
switch(hello)
Of course the whole thing from building and training a deep convolutional network to the cross-platform UI will be written in .NET + TensorFlow.

Advanced-level tutorial on training a deep convnet to classify language from code fragments
Contents
Building & Training Deep Neural Network
64 by 64 blocks of text
Normally to process a sequence of any kind (in this case - characters), one would use an LSTM - long-short term memory network. However, getting an LSTM network to recognize a programming language of an entire file is too easy and boring.
Instead, Not C# AI will take as input a 64 by 64 block of characters from a text file, starting at an arbitrary position.
For example, this file
Accelerate* AccelerateFactory::Create(
    int sample_rate_hz,
    size_t num_channels,
from position (2,5) will look like this:
nt sample_rate_hz,
ize_t num_channels,
If a file/line ends too soon, the rest will be padded with space characters to make a full 64 by 64 block.
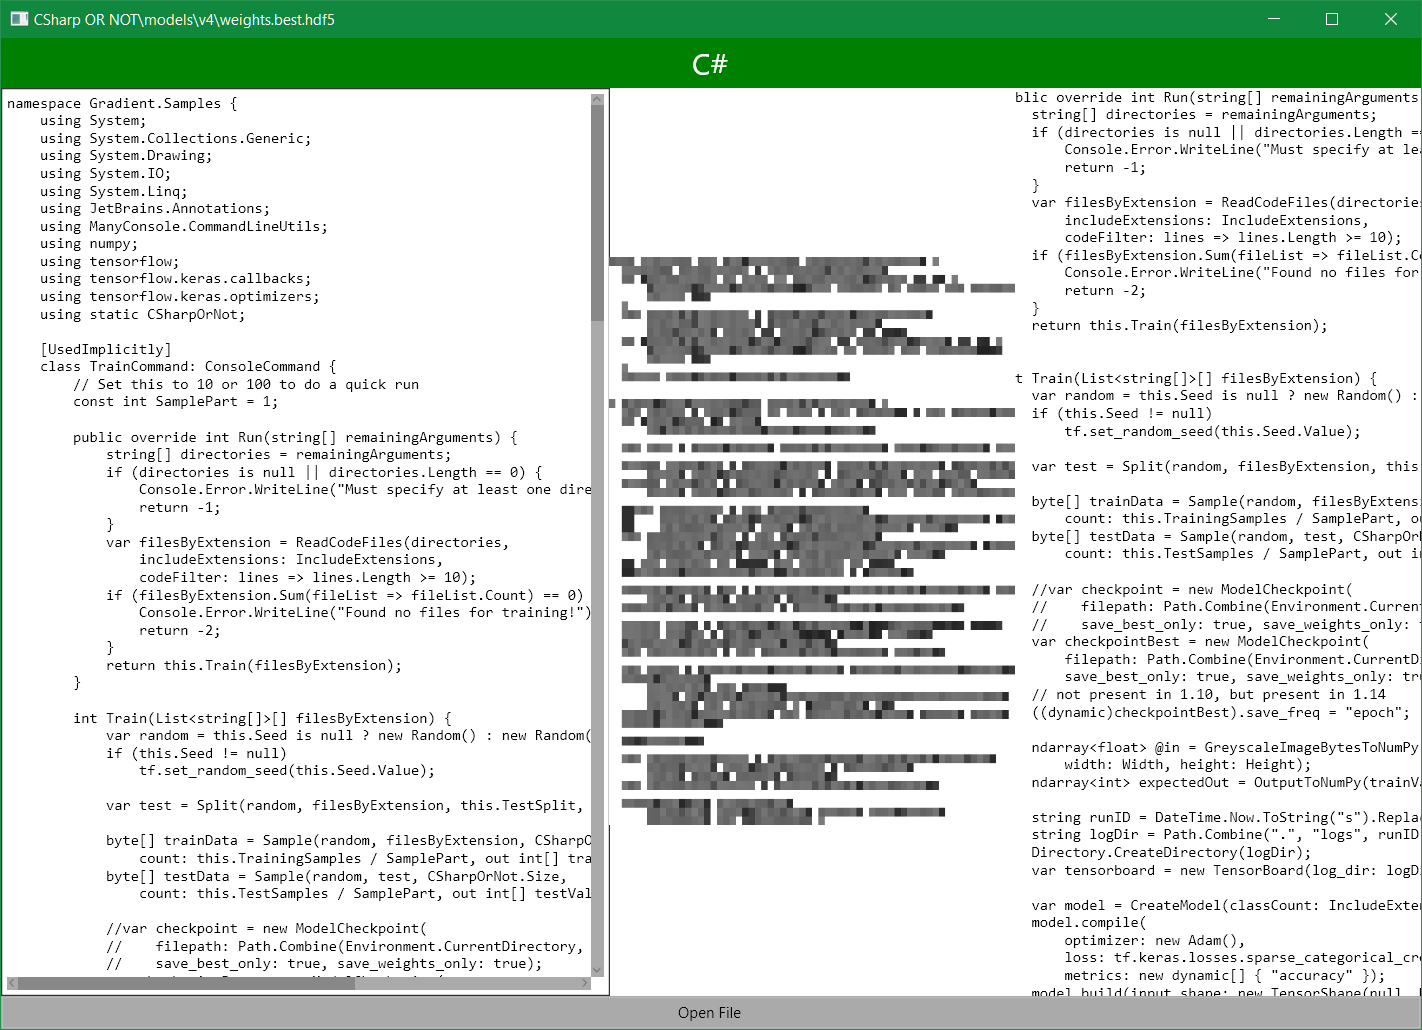
Every character will be converted to 0-255 range, and the whole input will look like a 64x64 grayscale image. You can see an example in the center of the pic below. Text on the right helps to understand which part of the code it represents, when you move the starting point.

Now try to guess the language from this image :)

HINT: there’s a single character in 2nd line from the last
Preparing data
Turned out my Projects folder has plenty of code with the following extensions: .cs, .py,
.h, .cc, .c, .tcl, .java, .sh, many coming from various open source libraries.
I also downloaded ~5 top trending GitHub repositories to have
some variety in the code styles.
All files needed some preprocessing on load: replaced tab character with spaces, and any characters with code above 255 with underscores (so that each character took exactly 1 byte, sorry, Unicode). Also replaced all other non-newline whitespace characters with code 255 to make them stand out.
I set aside 10% files of each type for validation. They are used at the end of the training to ensure the model does not just learn patterns specific to the files I train it on.
There were several thousand of files of each type, more of some, less of others. To ensure the model will
not be biased towards more popular languages, for each file type the training code samples ~50,000 64x64 blocks,
no matter how many files of this type there are. The process is simple: first, pick a random file with
specific extension, then pick a random line and column number to start sample from, then copy a 64x64 block of
characters from that position into a byte array, containing training samples.
Picking a file first ensures large files will not be overrepresented. The process is repeated
50,000 times for each extension to obtain enough samples (sampling code).
So inputs are 64x64 byte arrays, where character code simply turns into brightness of the “pixel”. In the end the network will only see the image in the center as input. Text on the right helps to understand which part of code it represents. Try to guess the language from that image, ha!
Building a convolutional network
2D block picture-like representation suggests to use a convolutional network architecture. One of the recent ones is called ResNet. Not C# will use a simplified version.
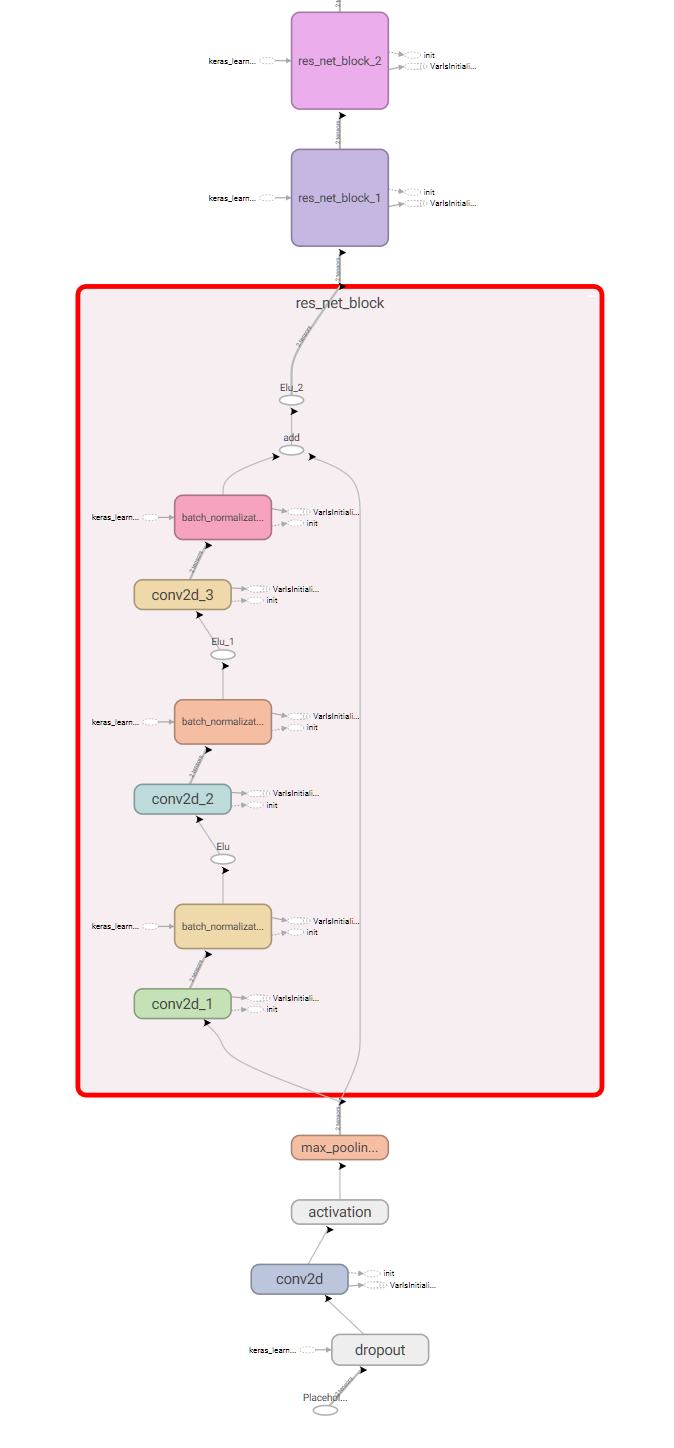
ResNet consists of blocks, which stack 3 convolutional layers,
connected by batch normalization
with a variant of ReLU activation.
The output of the stack is concatenated with the input before the last activation, which is called
skip-connection. Skip-connection is there to help errors propagate to the blocks, that are closer
to the image input, than to the classifier output. The block layers are composed in the CallImpl
function.
The ResNet block code is adopted from the official TensorFlow tutorial for composing layers.
public class ResNetBlock: Model {
    const int PartCount = 3;
    readonly PythonList<Conv2D> convs = new PythonList<Conv2D>();
    readonly PythonList<BatchNormalization> batchNorms = new PythonList<BatchNormalization>();
    readonly PythonFunctionContainer activation;
    readonly int outputChannels;

    public ResNetBlock(int kernelSize, int[] filters,
                       PythonFunctionContainer activation = null)
    {
        this.activation = activation ?? tf.keras.activations.relu_fn;
        for (int part = 0; part < PartCount; part++) {
            this.convs.Add(this.Track(part == 1
                ? Conv2D.NewDyn(
                    filters: filters[part],
                    kernel_size: kernelSize,
                    padding: "same")
                : Conv2D.NewDyn(filters[part], kernel_size: (1, 1))));
            this.batchNorms.Add(this.Track(new BatchNormalization()));
        }

        this.outputChannels = filters[PartCount - 1];
    }

    public override dynamic call(
            object inputs,
            ImplicitContainer<IGraphNodeBase> training = null,
            IEnumerable<IGraphNodeBase> mask = null)
    {
        return this.CallImpl((Tensor)inputs, training?.Value);
    }

    object CallImpl(IGraphNodeBase inputs, dynamic training) {
        IGraphNodeBase result = inputs;

        var batchNormExtraArgs = new PythonDict<string, object>();
        if (training != null)
            batchNormExtraArgs["training"] = training;

        for (int part = 0; part < PartCount; part++) {
            result = this.convs[part].apply(result);
            result = this.batchNorms[part].apply(result, kwargs: batchNormExtraArgs);
            if (part + 1 != PartCount)
                result = ((dynamic)this.activation)(result);
        }

        result = (Tensor)result + inputs;

        return ((dynamic)this.activation)(result);
    }

    public override dynamic compute_output_shape(TensorShape input_shape) {
        if (input_shape.ndims == 4) {
            var outputShape = input_shape.as_list();
            outputShape[3] = this.outputChannels;
            return new TensorShape(outputShape);
        }

        return input_shape;
    }

    ...
}
And the model itself is just a sequence of ResNet blocks with some pooling operations in-between + a fully-connected (Dense in TensorFlow) softmax layer to output “probabilities”:
public static Model CreateModel(int classCount) {
    var activation = tf.keras.activations.elu_fn;
    const int filterCount = 8;
    int[] resNetFilters = { filterCount, filterCount, filterCount };
    return new Sequential(new Layer[] {
        new Dropout(rate: 0.05),
        Conv2D.NewDyn(filters: filterCount, kernel_size: 5, padding: "same"),
        Activation.NewDyn(activation),
        new MaxPool2D(pool_size: 2),
        new ResNetBlock(kernelSize: 3, filters: resNetFilters, activation: activation),
        new ResNetBlock(kernelSize: 3, filters: resNetFilters, activation: activation),
        new ResNetBlock(kernelSize: 3, filters: resNetFilters, activation: activation),
        new ResNetBlock(kernelSize: 3, filters: resNetFilters, activation: activation),
        new MaxPool2D(),
        new ResNetBlock(kernelSize: 3, filters: resNetFilters, activation: activation),
        new ResNetBlock(kernelSize: 3, filters: resNetFilters, activation: activation),
        new MaxPool2D(),
        new ResNetBlock(kernelSize: 3, filters: resNetFilters, activation: activation),
        new ResNetBlock(kernelSize: 3, filters: resNetFilters, activation: activation),
        new AvgPool2D(pool_size: 2),
        new Flatten(),
        new Dense(units: classCount, activation: tf.nn.softmax_fn),
    });
}
I also applied a 5% dropout to the input for regularization (the first in sequence): it prevents model from memorizing exact lines of code from the training set by masking different random characters out in different training iterations.
Part of the resulting model graph from TensorBoard:

Training the network
So the model is built, training inputs are layed one after another in a giant byte array.
All that is left is to specify loss function (since we are classifying between several languages,
we will use sparse_categorical_crossentropy), and an optimizer (Adam). And start training:
model.compile(
    optimizer: new Adam(),
    loss: tf.keras.losses.sparse_categorical_crossentropy_fn,
    metrics: new object[] { "accuracy" });

model.build(input_shape: new TensorShape(null, Height, Width, 1));

model.fit(@in, expectedOut,
    batchSize: this.BatchSize, epochs: this.Epochs,
    callbacks: new ICallback[] {
        checkpointBest,
        tensorboard,
    }
);
This also uses TensorFlow Keras callbacks:
- ModelCheckpoint - which saves model weights as it trains
- TensorBoard - which enables tracking the training progress using TensorBoard.
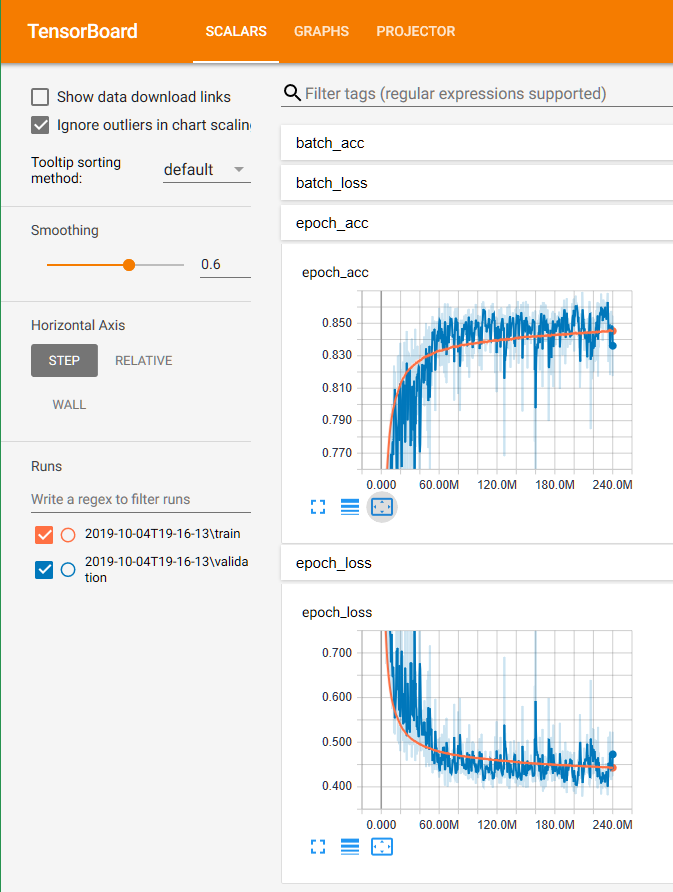
Here you can see the training progress:

The complete training code can be found here.
Training Issues
When I started with TensorFlow 1.10, after some training the model accuracy would drop to ~0.125,
which is the same, as if the model would pick random answer all the time. After spending
a couple of days debugging my code and tweaking the model to avoid potential weight infinities,
I figured out the issue was actually caused by a nasty bug in TensorFlow 1.10’s
BatchNormalization layer. So I had to install TensorFlow 1.14 alongside 1.10 and use it instead
(see how to).
XKCD debugging

Also, the original model did not have the dropout layer right after the input, so it was overfitting, until I added one.
Hooray!
After about 2 days of training on my GPU, I got a model with ~86% accuracy.
E.g. given a 64x64 block of text from a code file, it would recognize the language
correctly in ~86% cases, which is pretty good, considering C is similar to C++,
and they are both could be in .h header files. Also Java and C# copy each other.
As seen on the graphs above, the validation accuracy did not go up much after ~100M batches, so I could have stopped training after ~20 hours. Also, the training code could be optimized by using slightly larger batch sizes, and switching to 16-bit floats on GPUs that support them.
I published the trained weights to GitHub, so you don’t have to train from scratch, if you just want to play with it.
Making an app: Avalonia UI
That was the easy part of Not C#: I followed Avalonia’s official tutorial.
A couple of Grids, TextBlocks and some event wiring, and the app was able to load
code files, and use TextBox cursor position to select the starting point
of a 64x64 block of characters.
It also used cross-platform System.Drawing.Common NuGet package to render a nice image,
that network would see as the input. It worked great on Windows out of the box,
but on Mac I had to install mono-libgdiplus following this advice:
brew install mono-libgdiplus
NOTE: I had to use TensorFlow 1.14 for inference as well.
Also remember, that any input to the pretrained model must be processed the same way the training data was: Unicode characters replaced, and whitespace set to 255.

Look, it is C#!
Conclusion
Not C# demonstrates how to design and train a deep convolutional neural network with C# and TensorFlow. High-level Keras API is used to describe the model, and some OOP helps to abstract its building blocks away.
The pre-trained network can be used in a cross-platform UI app to load text files, and classify the programming language a block of text is written in.
The full up-to-date code of Not C# can be found on GitHub. Also, pretrained weights for v1.
